When creating an online version of print design projects, a designer must create a high quality PDF optimized for WWW distribution. For example, a PDF weighing less than 5Mb might need to be generated from a 100Mb print-quality PDF. Also, you will want to lock down the PDF to prevent theft of it’s text and images, and include a copyright notice. Follow these easy steps that explain how to optimize and secure a print PDF for web use.
Note that these steps require Adobe Acrobat Pro.
First, always make sure your fonts are properly embedded
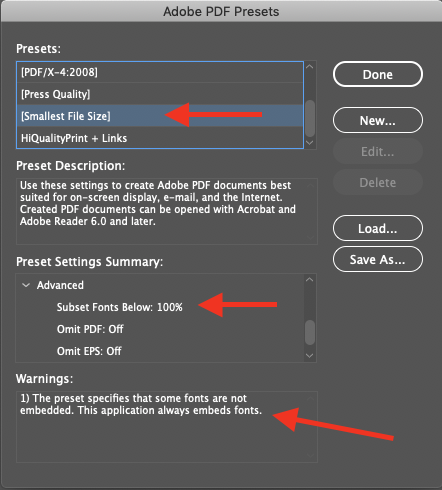
How to export an Adobe InDesign document to PDF
- Choose File > Adobe PDF Presets…
- Select one of the presets.
- Try “High Quality Print” or “Smallest File Size”.
- Test to see if the “Smallest File Size” PDF displays your fonts properly. (Ideally on another computer.)
- Specify a name and location for the file.
- Click Save
Optimize the size of PDFs
For PDF files that are intended to be distributed for viewing purposes only, you will want to reduce the size of PDF files that you export from InDesign. Here are some of the size reduction techniques you can use in the Export Adobe PDF dialog box:
- Choose [Smallest File Size] from the Adobe PDF Preset menu.
- In the Compression area, downsample images to no lower than 72 pixels per inch, select automatic compression, and select either low- or medium-image quality for color and grayscale images.
(When you work with photographic images, use Automatic (JPEG) compression; when you work with images that are mostly solid color, such as charts and graphs, use ZIP compression.) - To reduce the size of PDFs, simply open the PDF in Acrobat 8.0 or later, choose Document > Reduce File Size, and then specify the compatibility level. For greater control, choose Advanced > PDF Optimizer.
How to optimize a PDF file when you do not have the original InDesign (or other software) file
Note: Use this technique if your optimized PDF is still too heavy after using one of the other techniques listed above.
- Open the PDF that you want to optimize.
- Choose File > Save As… > Postscript.
- In the Settings options, make sure the font embedding is set correctly. Font inclusion: Embedded and Referenced Fonts.
- Save the Postscript file.
- Open Adobe Acrobat Distiller.
- Make sure to select the proper PDF Profile, such as High Quality Print, Standard or Smallest File Size.
- Open the Postscript file.
- Distiller should automatically convert the Postscript file to a PDF of the proper size.
- Open and double check the quality of the converted file.
Enabling options to secure a PDF
In Acrobat Pro, you can lock your PDF so no one can copy, print or modify your PDF. You can also require a password for opening or printing. You can embed your copyright info too.
Enable Password Security
- Open the PDF in Acrobat Pro.
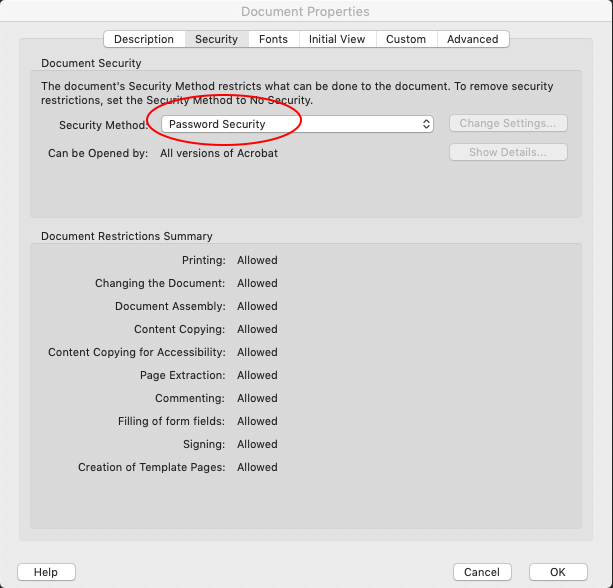
- Go File > Properties.
- Click the Security tab.
- Select Password Security from the drop-down menu.
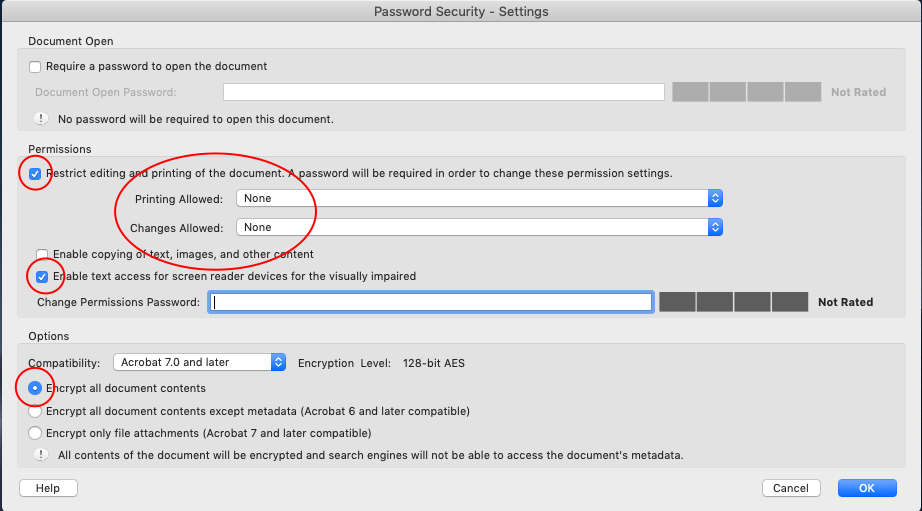
- Check “Restrict editing and printing of the document.”
- Select “No Printing” and “No Changes”.
- Uncheck “Enable copying…”.
- Leave the “Enable text access for screen reader devices…” box checked.
Further secure a PDF by adding your copyright notice
- Open the PDF in Acrobat Pro.
- Go File > Properties.
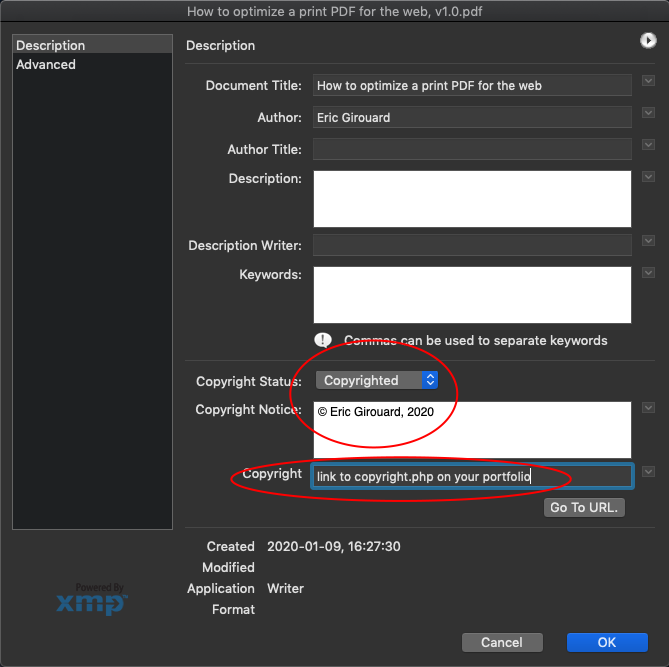
- In the Description tab, click the “Additional metadata…” button.
- Select “Copyrighted” from the dropdown menu.
- Add © Your full name, 2021 (macOS keyboard shortcut for © is Option-G)
- Add the URL to your copyright notice on your portfolio web page in the copyright field.
If you have any further questions or comments about how to optimize and secure a print PDF for web use, please drop them below!